
Hello, a late post from me today as I have had a very full day! Whilst Thomas was at school I spent the day with my Niece and Nephew and their Mum (my little sister) we had lots of fun at a soft play centre - I even found myself climbing inside a pretend pirate ship! Home for a yummy lunch (my sister makes the best sandwhiches!) then the younger two had a sleep and whilst I tidied up my Niece had fun with Play Doh and paint. What with the end of the day school run, then selling our second car, dropping hubby off for a night out with his colleagues, feeding the children, bathtime and bedtime it was nearly 9pm before I had a chance to stop! I have to say I wouldn't really have things any other way though.
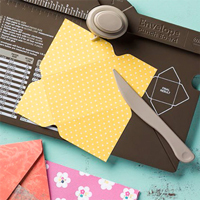
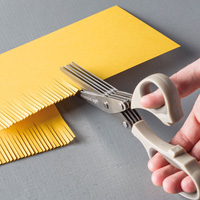
Right, sorry for waffling, onto today's crafty lovelies... these two cards are loosely based on some of the Make and takes for the last Stampin' Up! convention. I have changed things up a bit for my Stamp-a-stack event last weekend by using the paper that you can get for FREE with a £45 order during sale-a-bration. I simply used my Stampin' Write markers to selectively colour the stamps in and then huff on them before stamping the image.

This card is I think my favourite from the session and I have to say a huge THANK YOU! to my downline Beth for lending me her brand new, unused Hardwood background stamp. I love the freshness of this card plus it is easily a 'less than 5 minutes' job - it's always handy to have cards that you can knock up quickly.


![IMG_0911[2]](https://blogger.googleusercontent.com/img/b/R29vZ2xl/AVvXsEhN3BmNy4Wct-iOsgJv9PdYGqcijP1B1afXXNsU85QgabWtMoqSSEclTayDw6S1zK9D5u9NMD-nfuaNhQFZGO4_7E1TCMMm4EhNR4qGaQ6H7N8Vmh4T0p8cbgxu0nUvVSPPiH3Fiw4ufvM/s1600-h/IMG_0911%25255B2%25255D%25255B27%25255D.jpg "IMG_0911[2]")
![IMG_0912[1]](https://blogger.googleusercontent.com/img/b/R29vZ2xl/AVvXsEgnyvo62EcCiNmoe6fwZvSWJSOFdLjeIO5Iob7ib-A-kQuoFPVvapP8MbOdHKLAwVQOAs06yaKUQIHMtPLF2abnb_xv1t_Z-db1CxY90Fje-PJOTF7CDXdmWsBDxsIC-o1Bcru2rw5dmxw/s1600-h/IMG_0912%25255B1%25255D%25255B15%25255D.jpg "IMG_0912[1]")
![IMG_0913[1]](https://blogger.googleusercontent.com/img/b/R29vZ2xl/AVvXsEiV-sTmaZIZKlulp8NdoeRWwOJw9llZEl6_xMxc4rLCrdDZyRzPRiyc0LXMSwfBkCmlAzahpUZeN2qu_k2s11KlQPjS0f271JIEKcIrTeX2-Qz5b_4592H3eHa9m-e4IxbXAxiiBwpwUgs/s1600-h/IMG_0913%25255B1%25255D%25255B15%25255D.jpg "IMG_0913[1]")
![IMG_0915[1]](https://blogger.googleusercontent.com/img/b/R29vZ2xl/AVvXsEhEWxa3R56uTx7PihU_zLZ5r3fkx5lPIex3IUw8RBGrvyWR0T3eFT2ic5ZtuexKhTrykw5GwedfT3qDNjVIvos0p926mlgdPr3qiP81s2i8ytcnGeOPLMzmggJBAYgan87_kLFP0pSazRQ/s1600-h/IMG_0915%25255B1%25255D%25255B19%25255D.jpg "IMG_0915[1]")
![IMG_0916[1]](https://blogger.googleusercontent.com/img/b/R29vZ2xl/AVvXsEjLb8Z4zHJnWJ3ck4IpqdrKCh_ca80-u2fdG81it0lutOabkjfq1Qb95Y70mAlS9wQ9UrusgUhBbuEhGLVS_1I6yBuKS5TE2uPh-WzMUEsWQJpF5_UR6RLv26GFH84zk9RAfSDv9Lv_gK0/s1600-h/IMG_0916%25255B1%25255D%25255B15%25255D.jpg "IMG_0916[1]")
![IMG_0917[1]](https://blogger.googleusercontent.com/img/b/R29vZ2xl/AVvXsEgM26s-c0ceo8NZCP8jEFsYIieQ6CJcI6Lx6_aL1-eiledGbre_tDrNGeq3rHMj7lbyJGnq9clJLEb-Pt04UWCq2tEzqPAMZLlTtM3Z9nx_dlg3eUxMxBwml1OSLHKT6oc9lEM3Al2FTVw/s1600-h/IMG_0917%25255B1%25255D%25255B16%25255D.jpg "IMG_0917[1]")
![IMG_0919[1]](https://blogger.googleusercontent.com/img/b/R29vZ2xl/AVvXsEgiUw-_p2O-weVOLXADywZsG6f7Q-54LKLiUY2tmiIo8uaZYaBJnMEES8ayT8741szY2qfqRxAd12WoZxQgjWVuwPZmht1oKZeA_fuOfGBRoUR6FWXNmVrjkTIJkcb29QIqC3xWSfnE8OM/s1600-h/IMG_0919%25255B1%25255D%25255B15%25255D.jpg "IMG_0919[1]")
![IMG_0920[1]](https://blogger.googleusercontent.com/img/b/R29vZ2xl/AVvXsEhcEXpqnARzBhwNToXSIOy60rVUk1hgoUHDSaRSu4TRkUynCq9EAmDtNjvAA0_pafCY4o-Dx7evRGlT3vohB9wsBmtbOSgYiK4agCYEcVwfWyjc7BuqaqGmji-jwabiIVJq2LIN6Rf_ZzE/s1600-h/IMG_0920%25255B1%25255D%25255B14%25255D.jpg "IMG_0920[1]")
![IMG_0921[1]](https://blogger.googleusercontent.com/img/b/R29vZ2xl/AVvXsEjkoQoPduZoCqooYVKi0OBuHe4KAetfl84ItHet2SDuMoGuvpzdBT8oYlor537uYOwJMXhhHIfDFwJRqaPCEAymQFuPjk3FeqNqeUte8Cd_seFOiTB5LqY6DzJqL5g1PoVe9a1qBFV6fiw/s1600-h/IMG_0921%25255B1%25255D%25255B14%25255D.jpg "IMG_0921[1]")
![IMG_0922[1]](https://blogger.googleusercontent.com/img/b/R29vZ2xl/AVvXsEihBkbMY7W781CahOCG8m1J8YN5M9sCL3d5tA0os_CN9JT8JcyR6nz4LEOPRw6il_AQi2sg3vr255Gsf1JYBs4jo2p9daJUfkcQPT_CdwqkhlxSzEochXCslQIw3ZBhEbQgAX81c2yqBT0/s1600-h/IMG_0922%25255B1%25255D%25255B30%25255D.jpg "IMG_0922[1]")
![IMG_0924[1]](https://blogger.googleusercontent.com/img/b/R29vZ2xl/AVvXsEibBUcTb7HM_-O2GLjRLBWchmWPjcnEO2MK-EB0IJsdXrRdbX4hBs7HYPs1HhqSdS3iuI_p3YjDpR_LadGc3Skrnl0OuBrKPVf6HQxOmsj_yp08nncxWHxuYMyhdHPtWnxcxDO7fNNyw4s/s1600-h/IMG_0924%25255B1%25255D%25255B14%25255D.jpg "IMG_0924[1]")
![IMG_0925[2]](https://blogger.googleusercontent.com/img/b/R29vZ2xl/AVvXsEjbBZgd7DGuoiUkX6CqxrTu9JdXkKwCDXvUXdYsY1hZaM_AnBy5hGMKco4Lg132F1Gx39N9isFUd62q38PdfZDB6N2PvOKHRdMIGCTgwuO53gDeAp2cpnKZuQofb_lnjygAC8ggFzTbkiw/s1600-h/IMG_0925%25255B2%25255D%25255B15%25255D.jpg "IMG_0925[2]")
![IMG_0926[1]](https://blogger.googleusercontent.com/img/b/R29vZ2xl/AVvXsEj8Bndhhl2G4Estlj4eLkePrv3UzX4-v4qoHyTx70QTjZElrtXcqaySERgPKDhFTulmj6zDDmVNwTjbDuGm8x7ZohNiPWR0GbfgJPaqrxx39nlNTvj1OUDTmwH0tlKBW9jzJpUwsLT-OhM/s1600-h/IMG_0926%25255B1%25255D%25255B26%25255D.jpg "IMG_0926[1]")
![IMG_0927[1]](https://blogger.googleusercontent.com/img/b/R29vZ2xl/AVvXsEgPed7bswbQgELgMrzl9ibzG-sgwNdhav7rblYPRvwiI9Gr_c9GNosh0cDVD-hXq_WeLuvWOA_iQjFuGpv2id_Fk6p_kskuh_3muu57I4ZupzN1lxrCw6pNxwa_DNqrzQpdNoonD55q8fg/s1600-h/IMG_0927%25255B1%25255D%25255B34%25255D.jpg "IMG_0927[1]")
![IMG_0934[1]](https://blogger.googleusercontent.com/img/b/R29vZ2xl/AVvXsEj5S7Kz09DoISZQzJ4o_wC9aRaP_ImJ4OREGbK4SKKBGuxGV_9k-SoKjl6vSsQ4-qEveenndCiKpRAp33aZeYikKUnWgCi-b0g4NgrBqEk7vga7dslFcGS71VLR32lbNisMBlHfaIaKTsg/s1600-h/IMG_0934%25255B1%25255D%25255B41%25255D.jpg "IMG_0934[1]")


