Tuesday 25 January 2011

So Happy for You set....

 
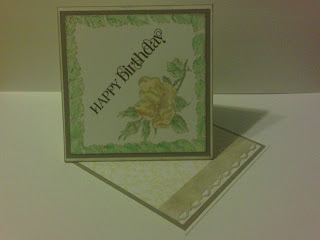
 After Sunday's blog hop I am still feeling massively inspired!  This is a scheduled post - as it's easier to keep things regular but at 10pm on monday night I was reminded of some beautiful cards that Sara and Fiona made for the hop so I thought I'd have a play with this set too.


Keeping it short and sweet - so colours from the Subtles family and some dsp too - the perfect plum dsp is retired as is the ribbon, but it still matches perfectly :)

Monday 24 January 2011

Inspiration.....

Lately I am finding myself looking at items of clothing - often Daisy's and saying ooh thats so and so a colour.  Or "Ooh I love that combo!"  Sometimes it'll even be "wow I have that image in a stamp!"

I wanted to share with you the results of one of those moments


This top is a tesco cheapy (great when they grow so fast!) the owl directly to the right of the card is the one I used as inspiration for my little fella, I just had to stamp an extra owl and cut his wings off!  They were then mounted on using dimensionals.  Cardstock is Real Red, Peach Parfait, Bluhing Bride and Crumb Cake with inks and markers used too. 

I've used the 2 step bird punch for the branch and the word window and blieve it or not the scallop oval to mount the sentiment.  'Thanks' is from the Sale-a-bration set So Happy For You and the Owl is from Punch Bunch.  If you spend £45 before the end of February you could choose either of these sets for FREE.

Sunday 23 January 2011

SALE-A-BRATION BLOG HOP.....

One of my favourite sites for inspiration and support is In Love With Stamping it has both a public side and a Demo side where we can talk about our Stampin' Up! businesses.

I am taking part in today's Blog Hop.  The idea is that you design and make something using any of the current SAB stamps and post it to your blog with a link to the next blog in the loop so here goes!

What a fab way to share ideas!  You should have arrived here from Margaret's Blog

Here are my samples, I have used the Punch Bunch stamp set - a must have for me as I absolutely HATE cutting out so these are brill as the stamps all have (or will have very soon in the case of the Owl) co-ordinating punches.  No fiddly cutting!


First up is the two owls, I got the Celebrations Designer Series Paper recently and love the colour combos so used that as my start point - Bashful Blue, Wild Wasabi, Pacific Point, and Real Red.  The card is a 6x6 basic left hand fold card, I've used textured card.  I used my markers to colour the owls as they have green wings with blue spots or blue wings with green spots (the green on the owls is actually certainly celery - whoops :)  I have also used the Scallop Trim Border punch and the 2 Step Bird Punch (just for the leaves)  I hand cut the owls hence no feet :) although they were really easy to do.  Finally I added the true friend stamp, I've sponged a little bashful blue ink on the edge and adhered this with a dimensional so that it 'pops'

 
 Next up is the really quick and simple HB card.  Very Vanilla base, this time a 3x3 card.  Rich Razzleberry ink and Rich Razzleberry Taffeta ribbon.  I tamped the image twice without re-inking and cut the centre out of the lighter image.  These are adhered with dimensionals.  Finally a piece of knotted ribbon to finish - DONE!


Finally for today is the For You card.  I've cased this card from Split Coast Stampers  I think it was Kristin Moore.  I often scribble down sketches when 'surfing' and I like to credit people where I can.  The colours are Pretty in Pink (basic cardstock, marker and DSP) Chocolate Chip (marker and ribbon) So Saffron (basic cardstock) and Wild Wasabi (marker)  I used my markers to colour the stamp then 'huffed' and stamped.  The picture isn't great but the right hand edge of the So Saffron cardstock is torn - I love that our card has coloured cores!
Before I say goodbye don't forget to hop over to Fiona's Blog for the next lot of lovlies!  If you check out the links below you can see the other 3 groups that are taking part too.


Group One starts HERE 

Group Two starts HERE

Group Three starts HERE

Enjoy your sunday! xx


Friday 21 January 2011

An old card....

I have been tidying up my stash in bits over the last few weeks - I found some cards and bits and pieces that I had been playing with but never finished.  Now one of my resolutions this year is to use up my stash so I added a stamped image into the appeture (from the Punch Bunch Sale-A-Bration set FREE when you spend more than £45 in one order before feb 28th) and voila - in the post it goes to one of my crafty friends :)


As I said last week Thursday's are not really a day when I have much time to craft so that's it for now.  Back soon!

Thursday 20 January 2011

Side Step Teddybears...


Well I managed to get out again last night to the class that Tricia runs - I was so glad when I managed to put Daisy to bed in time!

This week's card is a side step card - don't you just love the way we used the punch to make it look like a chest of drawers - add a bit of sponging and some popped up drawer fronts for dimension.  Ooh and the teddy peeking out too!  We used chalks to colour in the images, I love the really soft image you get.  I can't wait to have a play with this style of card.... messy teenage drawers, xmas gifts spilling out, the ideas are endless!


Before I go - there are still a couple of spaces left at my weekly classes that start soon, click on the classes tab for more info.  Everyone is welcome whether you have crafted before or not.  I look forward to maybe seeing you there!

Wednesday 19 January 2011

Tri Fold Card

Just a quick post for Wednesday - I promised myself that I would use up my stash of retired Designer Series Papers - this card was the first one that I made but I actually have only used a little bit of the patterned paper so I guess some more ideas are needed!

Excuse the untidy table in the background :)


This is a shot of the card laid out flat - you can't really see but I have stamped on the left and right panels in pumpkin pie.  I used the swirly leaves from the SAB set Sweet Summer, the flower that I have watercoloured is from the same set.


Hope you like it, I think it's nice and cheery!

Tuesday 18 January 2011

How To Make A 'Twisted Easel' Card

What a busy couple of days!  Sorry for not posting yesterday - should be able to get a bit caught up as I can schedule a few things to come up this week.  I have had some requests for instructions for how I made my twisted easel card - I hope that the following makes sense :)


  Start with a square card blank - I have used 10cm square here but you can do any size so long as the card is square. 


On the inside left of the card score diagonally from the centre fold to the top left hand corner (as the card is open)

Make sure all score lines are nice and sharp - your card should stand up like in the picture above.


Attach a piece of cardstock to the card base, I have used a 10 x 10 cm square as
this was my original card size but you could use a different shape or size to attach to the front.  When you have the orignal card closed with the crease on the left you simply need some adhesive on the bottom triangle section.


Above is a view of the back of the card.

I can't show you the finished card yet as it is part of a blog hop that is taking place on 23rd Jan at 10am so come back then to see it!

Friday 14 January 2011

Tidying up....


  .... my computer that is.  I found some pictures that I haven't shared, as Thursday is not normally a good day for crafting I have nothing new to show you but I thought you might like these.  The card above features Crazy for cupcakes - love it and a bit of bling too on the candle!


This card above shows how you can use the balloon and candle in Party This Way to create numbers, I used the Stampin' Write Matkers to colour directly onto the stamp and then highlighted a 1 and 8 in the balloons.

This card is from the inspiration boards at the recent convention - I just really liked the colour combo as it's not one I'd normally choose.

Bye for now - happy crafting.

Thursday 13 January 2011

Prize Draw Winner........

I had a table at a Christmas Fete a few weeks ago and I wanted to announce the winner....... Drum roll please............ Sami!!!!!!!

Congratulations Sami!  You will recieve a little bundle of lovlieness which includes a stamp and a little bit of ribbon too.

Happy Crafting!

Twisted Easel Cards...

 
... or atleast I think that's what they are called!
It was really lovely yesterday to go back to the card class that the lovely Tricia runs every week, I've not been able to go since having Daisy but I now have evenings!  Well for now atleast anyhow. These two cards were made from one A4 piece of cardstock plus extra for matting and layering. Just a really quick post today - hope you like the cards.

Wednesday 12 January 2011

Circle Circus on candles

This is the gorgeous gift set that I made for my Sister's birthday recently.  I went for really vibrant colours and stamped onto tissue and then transferred this to the candles.  I used Tempting Turquoise, Daffodil Delight, Melon Mambo, Rich Razzleberry and Old Olive.  I'll be doing a workshop on this method soon so keep an eye out!  The card is a fold that I think is called a 'Joy Fold' - it's a bit quirky just like my sister!  The letters are from the set 'Broadsheet Alphabet' and again I'm loving clear mount here!  So easy to line up.  You'll also notice that I have prettied up a brown paper 'lunch bag' to package it all in, I even made a co-ordinating gift tag!  

You've gotta love that everything is thought through with Stampin' up! The Circle Circus set that I used works with out circle punches and the scallop circle punh too - great 'cos I hate cutting by hand! I simply stamped the scallop circle from the set in 4 different colours, punched out parts using varying sizes of punch and stuck together.  Even the ribbon co-ordinates too, 1/4" Rich Razzleberry grosgrain this time.

Tuesday 11 January 2011

Xmas Thank Yous

 
As you may now have guessed I've been busy over the last few days getting batches of Thank You cards done!  These are the cards that Thomas helped me design for him to use as his Chhristmas Thank You.  He was very funny - he told me that I had to put 2 monsters on and that the red one is Daisy and he is the green one - lol! The recipe for this card is below.
Stamp set - Make a Monster (I used clear mount and blocks A and D), So Happy For You (GET IN TOUCH TO FIND OUT HOW YOU CAN GET THIS SET FREE)
Card Stock - Whisper White and Real Red 
Ink - Old Olive, Real Red (squidge the lids and use these to watercolour with an Aquapainter) Basic Black
Stampin' Write Markers - Marina Mist, Pretty in Pink, Pear Pizzazz, Basic Black (I used these to colour the deatails in once the image had dried.  Real Red - with the Colour Spritzer tool (this creates the mist effect)

Here's a close up...


I LOVE the Make a Monster stamp set!  It is so much fun to use and you have loads of choice as to what the monster look like because all of the features are interchangeable.  For me this is where the clear mount stamps come into their own, although the stamp a ma jig would work equally well.  If you'd like to find out more about 2 step stamping why not book a demo?  Click on contact me at the top of the page!

Bye for now xxx

Monday 10 January 2011

Baby Thank You Cards


 I know, I know Daisy is 4 months old and I am only just getting the Thank You cards sent out for all the lovely gifts we recieved!  It is disgraceful but atleast people are getting a lovely handmade card!  The recipe for this card is below.

Stamp sets - Bundle of Love and Just Believe
Card stock - Regal Rose, plus A5 blanks from stash and watercolour card
Punches - Word Window and Scallop Oval (trimmes to make a border for word window)
Stampin' Write markers in Regal Rose, Pretty in Pink, Blushing Bride, Basic Gray and Bashful Blue - use these to water colour the image using an Aqua painter.
Ribbon - I dyed some white ribbon from my stash using the Regal Rose reinker.

Here is a close up of the card.


That's all for today, but don't forget my weekly classes start on Feb 1st. Click on the classes tab at the top for more info on how to book your place - hurry they are going quickly!

Friday 7 January 2011

NEW CLASSES!

I've set a date for the new classes to start!  Click here for details!
Bye for now.
V x

Wednesday 5 January 2011

Time to SALE-A-BRATE!!!!!!


Wow! I'm not sure at all where the last six weeks went. They have flown by in a haze of calpol, wrapping paper, more calpol and a couple of hangovers! (not mine) I hope you have all enjoyed the festive period. I had a lovely time with family and of course enjoying Daisy's first Christmas. Unfortunately I didn't get anywhere near as much craft time as I would have liked. Still back into the swing of things now and I wanted to share some very exciting news from Stampin' Up!

At the start of the year Stampin' Up! launch their biggest offer of the year! During the Sale-a-Bration period there are 3 ways to earn FREE limited edition stamp sets. Click on the link on the left to find out how you can earn these gorgeous stamps. Below are some pictures of the beautiful SAB sets. Mine arrived today so come back later this week and I'll have some samples posted.

Bliss - this set is lovely for creating those vintage, shabby chic inspired projects.

So Happy For You - a great set for adding sentiments to your work.
Sweet Summer - this is a gorgeous 2 step stamping set that can be used to create a multitude of beautiful blooms, the possibilities are endless! If you want to find out more about the 2 step technique contact me to book your workshop.


Punch Bunch - this has to be my absolute favorite! I HATE cutting but each of these stamps co-ordinates with one of the fab SU punches. Yes that means that as of April 1st we have the Owl punch - wooohoooo!!!!!! Remember the Sale-a-bration sets are limited so if you want or should I say 'need' them get in touch before the end of Feb.