Friday 30 December 2011

Sneak Peek Blog Hop

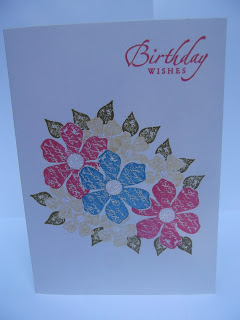
Good morning! It's been a while since I last posted, I have been soooo busy! Anyhow, I'm back and this morning I have some very exciting sneak peeks to share with you.  The two cards I am showing you today both use items from the upcoming mini catalogue, these brand new items will be available to order from January 4th so not long to wait now.

I don't know about you but I find it hard to get my mojo back after christmas.  I feel like I've been doing Reindeer and Baubles for so long that when I come to something else I'm stuck!  I was so pleased when my lovely upline Monica suggested a team blog hop, I new it would get me into the swing of things again.  I don't have many of the mini catalogue items yet but I hope you like my creations,  I've done two very quick and simple cards today, great for when you need something in a hurry.

Welcome to my little corner of the web if you are new and have come here from Lindsay's blog   Next stop on the tour is Gen's blog I will include the full list at the bottom of my post.


All supplies Stampin'Up! unless otherwise stated 

PAPER: Calypso Coral and Whisper White C/S Berry Blossoms DSP

INK: Calypso Coral

STAMPS: Fruits and Flowers

ACCESSORIES: Printed Desgner Brad - Lucky Limeade

Here's a close up of the detail on the brad.


For my second card I wanted to use some of the new fabric, until now I have wimped out! I still think I've taken an easy option, but it's a start!


All supplies Stampin'Up! unless otherwise stated

PAPER: Pool Party C/S

INK: Pool Party

TOOLS: Big Shot, Fun Flowers Die
ACCESSORIES: Spice Cake Designer Fabric, Linen Thread, Spice Cake Designer Buttons

DIRECTIONS: Cut each of the 3 flowers from a different pattern of fabric, layer up and then sew the large button in place using a darning needle and linen thread. Attach to the card front using glue dots.
 
I really hope you like my offerings :) Here is the full list of links to everyone who is taking part in todays blog hop.
   

Tuesday 8 November 2011

Clowning Around .....

Just a quickie today to share a card that we made at my weekly class.  I've used the new set Under the Big Top.  This a really cute set which has some fabulous images for colouring, great for fun cards.

I've been trying to showcase some different folds at my Monday classes, this one is a little fiddly at first but once you've got the hang of it nice and straight forward.  I actually have to thank a very good friend for this one, have seen it before but she prompted me to use it - thanks Beth.


This is what the inside looks like


And with a bigger piece of card you can create a double ended card and use it 'landscape', I've added an extra panel in the middle too.


That's all for today, happy crafting xx

Monday 7 November 2011

Roar!!!!!

There are some fantastic new kids/boys sets in the new catalogue.  One of my faves is Dinoroar- I don't have this set (yet) but managed to have a play a couple of weeks ago. Thanks to Amanda :)  Anyhow I wanted to share a fun little card. Apologies that the picture isn't great!


I've used Pool Party for the card base, and Sahara Sand for the ground. A bit of sponging for definition and the grass stamp from the set too.  Rex has been stamped onto Whisper White then coloured using Wild Wasabi and Crumb Cake markers, I've then cut him out and popped him up on dimensionals.  A nice simple card - and I'm told a very happy birthday boy!

Wednesday 26 October 2011

Christmas Card Club

These sessions are now 2 months in and I've been meaning to share the cards with you for ages! For today I'll share the first 5 designs that we did. Each session we make 10 cards for £10, 2 of each design.  If you are interested in coming along to these sessions held at my home in Northampton use the contact me tab at the top of my blog.  My inspiration for these cards  has come from all over the place and I have to apologise as I can't find my notes and so am unable to credit people at the moment.  If you recognise a card please let me know and I can credit you.

Card 1 - Dasher

Stamps - Dasher, Trendy Trees, Contempo Christmas
Cardstock - Not Quite Navy, Basic Black, Whisper White
Inks - Not Quite Navy, Concord Crush, Basic Black, Whisper White (Craft ink)
Punches - 1-3/4" circle punch

The moon is masked using the circle punch cut from a post it, I've then sponged the sky. The snowy ground is a torn piece of Whisper white. I've then stamped Dasher and the trees in place.


Card 2 - Season of Joy

Stamps - Season of Joy
Cardstock - Whisper White, Real Red
Ink - Real Red

A really clean and simple card that is nice and easy to duplicate.


Card 3 - Merry

Stamps - Tree Trimmings, Alphabet Stamp (retired)
Cardstock - Perfect Plum
Ink - Perfect Plum
Accessories - Stamp a ma jig

Once you've got the hang of the Stamp a ma jig this card is really easy to do.


Card 4 - Inlaid embossing - baubles

Stamps - Delightful Decorations
Cardstock - Crumb Cake, Cherry Cobbler, Garden Green, Whipser White
Inks - Cherry Cobbler, Garden Green
Accessories - Big Shot, Square Lattice Embossing Folder, Scallop Trim Border Punch, Bauble Punch

The baubles have been stamped and punched from whiper white card then adhered to the crumb cake layer.  This piece has then been embossed in the big shot. This technique creates a really lovely inlaid effect.


Card 5 - Merry Christmas Tree

Stamps - Season of Joy
Cardstock - Old Olive, Real Red, Whisper White
Inks - Old Olive, Whisper White (Craft ink)
Punches - Scallop Trim Border Punch
Accessories - Old Olive 5/8" Grosgrain Ribbon

To ensure that this card will still go standard post I have adhered the ribbon flat.


That's all for now, I'll share the second lot of cards soon.

Sunday 2 October 2011

NEW CATALOGUE BLOG HOP!!!!!

I'm sooooo excited! The new catalogue has gone live and is being really well recieved by everyone. For now it's just a quick scheduled post to share the card I've made for the blog.hop.  You should have come here from Dawn's blog if not hop on over and take a look at her creations.


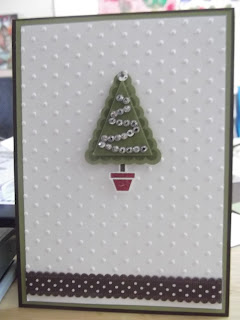
My card for today is a christmas card.  I've used one of the gorgeous new In Colours - Lucky Limeade, teamed with Early Espresso, Whisper White and a touch of Cherry Cobbler.  The card actually started off life like this....

But something was missing so I added the banner, the greeting is from Something For Christmas.  This stamp is actually 3 greetings with a row of babubles underneath, I simply used my Cherry Cobbler marker to just ink up 'Season's Greetings'  Would you have imagined that bunting could turn into a christmas tree?  I've used the stamp set Penant Parade along with the co-ordinating Petite Penants Builder Punch (YAY! No more hand cutting the bunting!) The ribbon at the bottom is the beautiful 1/2" scallop dots ribbon in Chocolate Chip.  To add some texture I've used one of my favourite embossing folders, Perfect Polka Dots. I do LOVE my BigShot!


Of course no Christamas tree is complete without a bit of bling! I've used our self adhesive rhinestones - lovely!  That's all for now, hop onto Maggie's blog to see what she's created.  The full list of participants in the hop is below too if you get lost anywhere along the way!  Enjoy the rest of your weekend xx

1. Lauralou http://airingcupboardstamping.blogspot.com/
2 AlisonP www.craftyalisoninlyon.blogspot.com
3 Glittermum http://www.mygroovystampinup.blogspot.com/
4. Theresa M http://my-next-chapter.blogspot.com/
5. SarahLP http://stampingobsession.com/
6. Sassy Stamper (Elaine) http://www.thesassystampers.blogspot.com/
7. Sarastamper (http://craftingandstamping.com)
8. JJ66 http://jan-crippin.blogspot.com/
9. Evy c http://evyscraftycreations.blogspot.com/
10. DonnaM http://www.head-over-heels-by-dlm.blogspot.com/
11. Scrappydiva http://www.stampin-divas.blogspot.com/
12. Natalie http://www.natalieoshea.co.uk/blog.html
13.Dawn http://www.tartanstamper.blogspot.com/
14. Vicky http://www.vickylouscorner.blogspot.com/
15. Maggie (maggiemae) http://thefineartofstampin.blogspot.com/
16. Julie H (The Crafty Bug) http://www.the-crafty-bug.blogspot.com
17. Elizabeth (Stash Fairy) http://elizabethscraftroom.blogspot.com/
18. Michelle (ShellieStamps) http://michellescraftypaper.typepad.com/
19. Keren. http://www.kerenbaker.wordpress.com
20. Emma (Daisydaye) http://emma-daye.blogspot.com/
21. Rachel (Rachel) http://www.stampingurl.blogspot.co.uk
22. Valerie (valmoody) http://stampingwithval.wordpress.com/
23. Kara (KaraM) http://karascraftycorner.blogspot.com/
24. Sarah (IOW Sarah http://www.stampinsarahiow.blogspot.com/
25. Tracey Rossos http://www.derbyshireducks.blogspot.com/
26. Patricia (Beckscraft) http://stampinbeckscraft.blogspot.com/
27. Sarah-Jane http://cardsandacuppa.blogspot.com/
28. Claire http://stampinupscrapper.blogspot.com/
29. Cupcake http://pinkycardsandcreations.blogspot.com/
30. Kimf http://kimfeecrafter.blogspot.com/
31. carolineskinner http://stampinupandbranchingout.blogspot.com/
32. Emma_H http://www.emma-letsstamp.blogspot.com/
33. Sally - Pink Sky. x http://pinkskysu.blogspot.com/
34. Carolyn http://stampaholix.blogspot.com/
35. Tina http://littlewhitehousecrafts.blogspot.com
36. Hayley (craftydevils) www.mycrafthaven.blogspot.com
37. allyf - http://serendipitypapercuts.blogspot.com

Friday 30 September 2011

I'll be back....

..... very soon hopefully! I will have my laptop back and will no longer be limited by borrowing a friends - thank you so much Mel xx

Anyhow I wanted to share a few pics of some things that I've been doing lately.  The first few are things that I've done with my weekly class.

These two cards use the fabulous Vintage Vogue.  They showcase a technique that I really like - masking.  This technique allows you to build up layers without the images overlapping.


We also did the rock and roll tecnique, this is a lovely 2 tone effect shown on the pink flowers.


A second card using masking.


And a close up - love the bling! 


The next card uses a retired set that I love! I've cased this card - but I'm really sorry because I can't remember where from.  The set is Loads of Love, the presents on the back of the truck are from the accessory set.  The truck actually slides - what fun!  I'm loving cards with movement at the moment and can't wait to try this card with some new stamp sets!


That's all for now.  Keep your fingers crossed that my new hard drive gets fitted very quicky!

Wednesday 14 September 2011

Technical Update

I wanted to update you on my technical issues as I've had a few questions.  It turns out the problem is on my memory card for my camera.  Quite simple to solve as I just need to get a new one, I will need to take new pictures though as the ones on the card are lost :( thankfully not too many as I'd only recently cleared it.

I will be back soon to share my very late blog hop pictures! Thank you for being so patient.

Saturday 10 September 2011

Last Chance Blog Hop

Due to a technical issue I am unable to publish my project at the moment.  Please hop onto Shelli's I will be back later to fix the problem xx

Monday 5 September 2011

Baby Blossoms - a bit different

One of my favourite stamp sets at the moment is Baby Blossoms.  I use the clear mount version and I LOVE that you can do two step stamping without the stamp-a-ma-jig and get stunning results!  I'd seen lots of people use this set to make some beautiful backgrounds and then whilst browsing recently I saw a gorgeous vase design.  I can't remember who did the original card but I knew that I wanted to try it out.


My monday night class members each did their own versions too and I love that this card is so quick!  I did the vase using the negative from the ornament punch as a template and traced it using an aqua painter.


Because the vase card was so quick we also made this card...


Can you believe that it uses the same stamp set?!?  I originally made a version of this card a while back at my upline's.  Again it's very simple, tear a piece of copy paper to and sponge over it using blues and greens to achieve the lanscape then stamp in the trees and the foreground shubbery.

That's all for today - very busy this week but will be back soon!

Sunday 4 September 2011

RETIRING ITEMS - UPTO 40% OFF!!!

Just a really quick post today as I am busy prepping for classes.  If you want to see which items are retiring at the end of september click on the 'say goodbye' picture on the left and it will take you to a pdf list.  Some of the items are discounted by upto 40%. Contact Me to place your order. 

Friday 19 August 2011

New Christmas Card Club

I love to send homemade Christmas cards, the only thing is every year I wish that I had got started earlier!  I always end up doing loads at the last minute!

Can you relate to that?

This year I have made a promise to myself that it will be different, and I can help you too!  I am running sessions each month from September until the middle of December to help get you organised with finishing all your Christmas Cards. 


What do I get at each session?

Materials to make 10 post friendly cards with envelopes. (They won't be too thick/bulky)
A special order deal EXCLUSIVE to christmas club members.
First time attendees will all recieve their own Tombow glue from me FREE.
Refreshments - usually I make cake YUM!

Do I need to bring anything?

Please bring your own basic tool kit including at least scissors, a bone folder, foam pads, and your favourite dry adhesive (double sided tape / tape runner).

How much does it cost?

Each session costs £10, If you attend all 4 you will recieve an extra FREE gift from me.  Booking is essential as space is limited.  You can join us for 1, 2, 3 or all 4 sessions.  You can even come more than once a month if you like!

If you want to bring along a friend who has never crafted with me and is not already on my mailing list both of you will recieve a voucher worth £5 which can be redeemed against the class cost or a catalogue order.

To book your place and arrange payment email me.

Where and when are the sessions?

The sessions will be at my house in Northampton, I will give you details when you book your place.

Times and dates as follows

September:
Saturday 10th 10.30am - 12.30pm
Wednesday 14th 7.30pm - 9.30pm

October:
Wednesday 12th 7.30pm - 9.30pm
Saturday 15th 10.30am - 12.30pm

November:
Saturday 12th 10.30am - 12.30pm
Wednesday 16th 7.30pm - 9.30 pm

December:
Saturday 10th 10.30am - 12.30pm
Wednesday 14th 7.30pm - 9.30pm

I'm really looking forward to my christmas crafting! Get in touch to join me!

Thursday 18 August 2011

Cased cards for Father in Law's Birthday...

I often hop around for inspiration and two ladies whose work I really love areVictoria and Julie.  It's a while now sine my Father In Law's birthday but when I sat down to make his cards I was seriously lacking in mojo!  I knew that for the card from the children I wanted to use the really cute set All In The Family and after some searching I knew that Julie's card was perfect! Here's my take on it.


Colours are Bashful Blue, Early Espresso and Old Olive.  The 'Daisy' and 'Thomas' are from All in the Family - yes Thomas really does have that crazy curly hair! :)  I used my inks and Blender Pens to colour them in.  The blender pens are fantastic value, you get 3 double ended brush pens (so that's six pens really!) for £7.95.  I've also used the Just Perfect Alphabet which fits perfectly inside the bunting from Party This Way.  The sentiment is from the level one hostess set Afterthoughts I've used a marker to ink it and omitted the bits I didn't want.  This sentiment fitperfectly inside the Curly Label punch which I have punched again in Old Olive and cut in half to use as a mat.  Finally the cardstock on the bottom half of the card was embossed using the Big Shot and the Square Lattice embossing folder.  This card is actually A5 finished size - so it proves that you can emboss bigger bits than the embossing folders - don't be shy have a play!

Now I don't normally do very much inside my cards, but as I wanted Thomas to be able to write clearly I added a simple whisper white mat with the sentiment again from Afterthoughts.


Here's the card that I cased from Victoria.  Colours are Whisper White, Old Olive, Concord Crush and Marina Mist.  Stamp sets are Schoolbook Serif Alphabet and the retired set Punch Bunch. I've used the co-ordinating Scallop Square punch and raised it up on some dimensionals.  My Stamp-a-ma-jig came in really useful for both of these cards to help line the letters up!


Here's the inside, sentiment and candles from Party This Way.


Hope you like todays offerings!  I will be back tomorrow with some news about some NEW classes!

Wednesday 17 August 2011

Waterfall cards

I'd never made a waterfall card before but have wanted to try for ages.  I decided that I would have a look on you tube for some inspiration and this is what I came up with.  We made these at my Monday night card club last week and actually had time to make two!  There is some space available on monday nights so get in touch if you'd like to come.  More details are on the Clubs and Classes tab at the top.


The left hand card is So Saffron and the one on the right is Tempting Turquoise.  The stamp set is Pocket Silouhettes, this is such a versatile set!  The dsp I've used is retired and I can't remember what it's called.  I hope you like the cards and maybe I've inspired someone else to have a go at a waterfall card!

Sunday 14 August 2011

Dazzling Diamonds......

..... Glitter EVERYWHERE!


Whoops! There really was glitter everywhere, all over me, my clothes, the table, the floor!  I am still finding it!   I don't quite know how less than a teaspoon of glitter went quite so far :)

Anyway the glitter was out because I'd been making the invites for Daisy's first birthday party.  The photo's don't do the cards true justice, I used a two way glue pen and added dazzling diamonds all over the frosting.


Here's all of them together, I have to say I think that Crazy for Cupcakes is one of my favourite birthday sets - I'd love to know what your favourite set is!

Saturday 13 August 2011

August Thank you cards

Just a really quick post today.  I wanted to share with you the Thank You cards for my customers this month.  I've used the stamp set Itty Bitty Bits along with the co-ordinating punches.  The sentiment is from Curly Cute.  Colours are Tempting Turquoise, Old Olive, Daffodil Delight, Peach Parfait, Melon Mambo, and Rich Razzleberry.  I've used the gorgeous white shimmer card.


Remember if you place an order over £75 or host a workshop with total sales over £250 in August you will recieve a free gift!  That's all for now, happy crafting!

Monday 8 August 2011

Scrapbook Club

The monthly Scrap club at St Crispin's in Northampton has been running for 3 months now and I wanted to share some of the bits and pieces that we have done.  I am new to scrapbooking and it was my downline Georgie who initially was keen to set this group up, I am so glad that she pushed me!  We meet on the first Tuesday of every month and work on a double page 12 x 12 layout. 

For our first ssession we worked from a sketch, and chose the colours Bashful Blue, Certainly Celery and Pretty in Pink.  I did a layout using pictures of Daisy.  We demonstrated a couple of techniques with ribbon and also I showed how to use the embossing folders and the BigShot to emboss a 12 inch length.


 Still being quite new I kept my layout quite 'flat' I am starting to come to terms with more interactive layouts :)  I could have had pull out tabs for journalling etc.


This is Pam and Denise's take on one of the pages of our sketch, the colours in the dress tie in beautifully!


For our second month we had a theme of 'Celebrations' and our colours were Rose Red, So Saffron and Marina Mist.  We demonstrated paper piecing with strips of dsp and card to create a backgorund, we also did some sponging.

I'll be back very soon to share the results with you as the pictures are on another machine!

Happy Crafting!

Wednesday 3 August 2011

Freebies........

This post will stay at the top of my blog until the end of August, scroll down for posts.

Everyone loves a freebie right?  Well I certainly do and I can't wait to get my hands on mine.  Stampin' Up! are running a fab pomotin in August! 


The gift includes a beautiful and EXCLUSIVE cosmetic bag (mine is going to be used to store my crafty things!), a 9m roll of 1 1/4" striped grosgrain ribbon which is not available in the catalogue and a pack of 24 assorted clips.

To get your hands on this gorgeous gift you need to place an order for £75 or host a workshop with sales totalling £250 or more.  Contact me to place your order or book a workshop.

Wednesday 27 July 2011

Christmas in July!

The instructions for the projects we made are all ready in PDF format.  If you'd like a FREE copy become a follower and email me I will then send you the file.


I'll be back soon with more crafty fun!

Thursday 21 July 2011

BOGOF EVENT

EXCITING NEWS!

I am holding a craft and cake evening at my house in Northampton on Friday 29th July at 7.30pm
During this event I am offering a But One Get One Free offer on all my retired stamp sets.  Here's how it works, you buy a retired stamp set and you get to choose items to the same value from the current Idea Book and Catalogue or the mini catalogue. How fabulous is that?!

We will also of course have some scrummy cakes and I will demonstrate some of the fantastic products that Stampin' Up! offers.  Finally you will all get a chance to get a bit crafty yourself with the free make and take project that you will get to take away with you.

picture © Stampin' Up!
And that's not all, you will get the chance of more FREEBIES as I'm also raffling off the hostess benefits from the night and there are lots of ways of getting tickets for that raffle. You can of course buy raffle tickets but there are ways of getting them FREE too! Bring a friend I don't know, book your own home workshop or even become a Stampin' Up! Demonstrator.


What are you waiting for? Email me by the end of Wednesday 27th July to let me know you are coming.


Monday 18 July 2011

Inspiration from Training

I posted yesterday about the swaps that I made to give to people at the training event.  Another really great thing about these events is that there are so many samples of other peoples work for us to look at.  There were 'inspiration stations' and workshop wow's and so many ideas to take in.  Today I am going to share a few of my favourite.  I will credit people where I can remember but apologies if I miss someone, if it's your work or you know who it is please let me know!

Firstly I want to share one of the amazing items that Claire made usinf the owl punch.  I think that it almost looks like an owl family tree!


Next two items made by the very talented Dawn.  First are some beautiful bag/boxes, I love the vibrant colours in the one on the left!


The second pic from Dawn's table is a beautiful paper lilly - I must try this out very soon!  Dawn had also made roses using the ornament punch and you can just see one of these too.


Next for one of the workshop wows we were shown how to get more out of the Scallop Envelope die for the BigShot, I am sorry but I didn't catch the lady's name.  I love this idea as initially the size of the finished box seems a bit limiting - so many more ideas now though!


Finally another workshop wow and again I missed this lady's name, I think I was too excited by all the WOW'S!  This technique produces a fake patent crocodile skin effect and it looks so fantastic!  I hope you can see the detail on the black section of this cute little purse.  I will be playing with this technique as it looked like lots of fun!


That's all for today, I hope that you are feeling as inspired as I was.  I will be back soon and will share the projects that we got to make at the training event, I just have a few bits to finish up :)

Bye for now

Vicky x

Sunday 17 July 2011

Swaps for Training

I have just spent a lovely day in Bicester at Michelle Last's quarterly training event.  I love that everyone in this company is so welcoming, I feel very priveliged to be allowed to join in this training as I am not actually a part of Michelle's team.  I have also been to other teams events in the past too and always feel so welcome.  These days are always so much fun and one of my favourite parts of the day is swapping.  We make a card front or small 3d item and swap these with other demonstrators.  It's a great way to get some inspiration!  This time I decided that I wanted to have a go at some of the patchwork style embellishment that I have seen a lot of recently, I've stepped it up a bit by also using the Vintage Wallpaper embossing folder.


Start with a piece of whisper white cardstock and a pile of pre cut (or punched) squares.  I used the 1 1/4" square punch as it's great for speed and accuracy!  On my swap I've used Greenhouse Gala designer paper.  Adhere the squares in a patchwork pattern to the white card, you don't need to follow a pattern.  I just played with what 'looked good'.  You then run this through the BigShot with the Top Note die and then run the Top Note shape through the BigShot again using the embossing folder of your choice.


I've only used half of each Top Note shape and I've added a strip of pear Pizzazz cardstock as an accent.  The sentiment is from Sincere Salutations.  I hope you like it! I'll try and be back later in the week to share more crafty goodies with you.

Bye for now

Vicky x

Friday 1 July 2011

BLOG HOP

Good morning!  I am actually up very late on Thursday night scheduling this.  I'm using Hubby's work laptop as mine is still looking quite dead - I hope my brother can rescue my piccies at least!

Anyhow today's post is a blog hop based on the Stampin' Up! Colour Coach.  This is a fab bit of kit that suggests colour combinations - I love it, especially for those moments when the creative juices just aren't flowing.

You should have come here from Karin's blog.  If not pop over and take a look, Karin is a very talented lady!  I've chosen Real Red, Crumb Cake and Bashful Blue.  I made a card for my son's 6th Birthday today.  (Big birthday kisses xxxx)  The stamp sets are Party This Way and Just Perfect Alphabet.  I've kept it really simple as I've had 12 birthday cards to make over this week!  When I have more time with the computer I will try and get more posted.


I hope you like my offering.  Next it's time to hop on over to Jan's lovely blog to see what she's been upto.

Thursday 30 June 2011

BIG SHOT OFFER (this post to stay at top till end of June scroll down for posts)

Why do you NEED a Big Shot?

Well, it’s a sturdy manual die cutting machine that’s so easy to use. It can cut through 50 different materials including fabric, foil and chipboard. It is lightweight, doesn’t require electricity and so you can take it with you wherever you go.
 
The possibilities to create are endless and with Stampin’ Up! exclusive dies and embossing folders, I can’t leave mine alone! The range of products available for the Big Shot will continue to expand, so get yours now before you get left behind!

I have a fabulous bundle offer for you to help get you started. The bundle does not only contain products, it includes hostess only items and a face to face or email PDF class.
Vicky’s £150 Big Shot Bundle:
(bundle onley available during May and June 2011) 
  • 1 x Big Shot Machine
  • 1 x Bigz L die of your choice
  • 1 x Bigz die of your choice
  • 2 x Textured Embossing folder of your choice
  • 1 sizzlits die of your choice
  • 1 Embosslit die of your choice
  • 1 x Level One Hostess Gift
  • £15 product of your choice
  • FREE Idea Book and Catalogue and Mini Catalogue
  • FREE P&P
PLUS - for everyone who buys a BigShot from me at any time


On top of their three year product guarantee you will get personal tuition (face to face or an email pdf) on how to set up and operate your Big Shot, an invitation to attend a Big Shot Technique Class for free, membership of my Big Shot Cub. Members get a monthly Big Shot Project Sheet

Places on a Big Shot Technique Class are available to those who already have a Big Shot or who purchase it elsewhere at a cost of £20 per person for a 2 hour class.

Membership of the Big Shot Club is also available to those who do not purchase their Big Shot from me at a cost of £2.50 per month.  Membership will get you a monthly project sheet featuring a project using Big Shot dies &/or embossing folders.

Contact me today to order your bundle: 07833957827
or vicky_wragg@sky.com

Thursday 23 June 2011

Birthday Blossom

I was recently asked to make a special birthday card for a lady's 60th and today I wanted to share what I made.  I didn't want to do a card with 60 on it as I wasn't sure this would be appreciated :)  I decided to use Build a Blossom.  This is rapidly becoming a favourite as with the co-ordinating punch it makes really impressive flowers incredibly easy to assemble.


I am still having problems with my laptop and can only get online at limited times, but I just wanted to remind you all about the monthly scrapbook club that takes place on the first Tuesday of every month.  Click on the classes and clubs tab at the top of the page for more deatails.  Also I am really looking forward to the owl punch class I am running on saturday!  I will share the results as soon as I can next week.  If you'd like to come along to one of these workshops get in touch to reserve your space.

Thursday 16 June 2011

TECHNICAL ERRORS

I'm having major issues with my computer at the moment.  I don't know how long it's going to be but please bear with me.  Hopefully I can grab some access at friends and family but I am able to post to facebook using my mobile phone so check out my facebook page Stampin' with Vicky

Thursday 2 June 2011

I'm back with NEW monthly class details!

Well I haven't really been anywhere but I had a really nasty case of tonsillitis which really knocked me for six and I only really recovered last Sunday.  Now it's half term so I'm busy with very important things like Lego and Power Rangers!  I just wanted to pop on and let you all know that I've not disappeared and for those of you who have asked yes I'm fine just need to get back into the swing of things :)

I wanted to share with you details of my new monthly classes, these will be running on the last Saturday of every month at my house in Northampton.  Check out the Clubs and Classes tab at the top of the page for full details.  The first one - Punch Art with the Owl Punch, is proving very popular so if you want to reserve your place please let me know ASAP.  Sneaky peek pics will be ready next week too so come back and check them out!

Also a reminder about Monday night craft club sessions.  These are going really well and I LOVE sharing my crafting.  I currently have 2 spaces available, sessions are every Monday from 7.30 - 9.30pm and cost £6.50 again check out the Clubs and Classes tab for more details and get in touch to reserve your space.  

Due to technical issues (well I can't find my camera lead!) I can't share the picture that I wanted to today but here is the card we did 2 Mondays ago.  We used two of my favourite sets Butterfly Prints and Flight of the Butterfly along with the co-ordinating punch.  Believe it or not the whole card is made using white cardstock - I've used a range of sponging techniques to add colour and depth.  It just goes to show that you can start card making with a very small amount of product.

    
I'll be back soon with details of the AMAZING offers for June and July!