Wednesday, 30 March 2011

Greenhouse Garden Mini Album


 Now for those of you that know me and my crafting habits you will already know that I am a cardmaker at heart and don't find it that easy to do other things.  Well I recently found inspiration from the lovely Bekka and decided to make this mini album, great as a gift for grandparents with piccies in!  The book is made from a single 12 x 12 sheet then you just needs extras for the tags and decoration.  I stamped my own patterned paper.


I've gone for bright 'spring' colours - Daffodil Delight, Melon Mambo, Pear Pizazz and Blushing Bride with Old Olive for the tags.  The ribbon is Old Olive 1/4" and 5/8" grosgrain, I've tied a bit of linen thread around the narrow ribbon too.  The stamp sets are Greenhouse Garden (really easy 2 step stamping even without the Stamp-A-Majig!) and Oval All, punches are the large oval, the scallop oval and the scallop edge border.  I even used the little bit of 'waste' that you get too, thanks for the tip Bekka!  The only thing I'm not sure about at the moment is if there is too much white space on the patterned paper?  I'd love to hear your comments.


Monday, 28 March 2011

More training swaps

 One of the reasons I love Stampin' Up! is that I have met so many new friends, all of them as crazy about crafting as me, in fact some even more so! :)

Today a very quick post but I wanted to share a few of the 3d swaps that I recieved at the recent training event, swapping is a great way to get inspiration and this time round was no exception!  I can't show all of them yet as some were using items from the mini catalogue but here are a few...


Back left is a tissue holder then clockwise round a fab pirates treasure chest, a gorgeous treat pouch then a little tea bag holder.  Thank you so much for your swaps ladies!

Friday, 25 March 2011

Ooops - naughty blogger

Sorry! I've been finding it really difficult to find time to blog this last couple of weeks.  The interest is my weekly club has been amazing and I am busy prepping for the first session - how exciting!  Also I have been making lots of stuff with the gorgeous products from the new mini catalogue but can't share those yet - you'll have to wait till April 1st :)

Anyhow have managed to get a few bits scheduled atleast so there are some crafty offerings coming up over the next few days.  For today I wanted to share with you some of the lovely swaps that I got at the training session in Coventry last weekend, thank you so much ladies I am in awe of the work that has gone in to these!

Saturday, 19 March 2011

Stampin' Up! Regional Training...


 I am attending training in coventry today - can't wait to share all the exciting news with you!  In the meantime I wanted to share an older project with you.  I am plannig to update this by making it in current cardstock papers etc and using punches for the leaves where possible.  Below you can see where you would write your message.


The bottom picture shows how I got around standing the card up - I made a 'leg' to attach to the back.

Friday, 18 March 2011

Petal Card Punch - mini box photo tutorial

Well, something new for this evening! I'd seen this box on you tube fantastically demonstrated by Mary - check out her blog.  Anyhow I wanted to give it a go and I thought that I'd include step by step pictures of the process it's so easy and really satisfying too.  Here goes.....

Supplies needed:
  • Petal Card Punch
  • Scissors
  • Sticky Strip
  • Stamped image and extra embellishments for decoration - I've used the level 2 hostess set cute by the inch stamped onto whisper white cardstock using Marina Mist ink and basic rhinestones
  • Ribbon for tying - I've used the 1/8" taffeta ribbon in Marina Mist
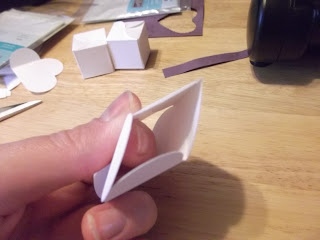
Step 1 - punch out 4 of the petal cards.  It works best to use the punch flat on the table and press over the centre, that way you get good score lines and a neat cut.  Cut one of the tabs off each piece then add some sticky strip down the edge on 3 of them.  Fold all of the score lines using a bone folder to get nice sharp creases.


Step 2 - Stick the four pieces together as shown.  Turn over and adhere another piece of sticky strip.


Step 3 - Make sure that all of the edges are well stuck to each other by pressing firmly.


Step 4 - Fold the flaps in on each other one at a time, the last flap needs to tuck under the first.


Step 5 - Add a treat before repeating step 4 on the top of the box.


Step 6 - Tie with ribbon and add embellishment.

Another Cupcake...

 
I had a really nice time with my Mum yesterday - she wanted me to show her want I'd learnt on my cupcake decorating course so we had a great time playing.  I have decided that I really like the rose finish to the butter icing and I wanted to show you just one of the cakes - my favourite of the batch and it was sheer luck!  The pink icing had run out so I just filled the bag with the uncoloured icing without washing.  Isn't it pretty?

I'll be back later with a photo tutorial for a really cute little box - I just need to tidy up and find my camera whilst Daisy is sleeping.  Bye for now!

Wednesday, 16 March 2011

Cased from Julie...


Thomas had a few birthday parties to attend recently and I'd run out of cards for little boys - eek! Anyhow I whipped out my Make a Monster stamps (I love this one for little boys) and cased a card made by Julie I didn't have time for quite as much embellishment as I'd have liked but the card was very well recieved!  I think that the Celebrations DSP is fab and the colour combo of Real Red, Old Olive and Pacific Point is really vibrant - great for boys!

That's all for today - hopefully can get some bits scheduled for the next few days or so.  I have so much that I want to share but can't until April 1st!!!!!

Tuesday, 15 March 2011

Cupcakes....


 I wanted to share with you the results of a course I did at the weekend - cupcake decorating at Mum's Who Bake.  We did some glace icing (the purple one with the pink butterfly) and also piping with buttercream.  We also learnt some techniques with sugarpaste (fondant for any American followers).  I had so much fun and everyone is amazed with the results, above is my finished box.  I met some lovely ladies and their cakes were beautiful too.  It's difficult to choose a favorite but I really like the rose effect swirl so I guess 3rd from the left in the middle row and also the bottom right - so simple yet effective.

Now the cakes didn't last long once I was home but a did want to gift a couple of them so I made some cute little gift boxes and used the cake stamp from the level 2 hostess set Cute By The Inch.


 I mounted the image onto the scalloped square and then popped it up using dimensionals, below you can see the top of the box - I made a cutout so that you can see the contents.


Here's a close up of the sugarpaste decoration - so cute!


And finally in a different colourway to tie in with the sunflower on this cake.


Wednesday, 9 March 2011

New Club details and a sneaky peak.....

First I just wanted to let you all know that after a bit of a false start the weekly club is changing from a Tuesday to a Monday.  Any of you who were unable to come or any new people that are interested click on the tab at the top for more details or drop me a line

Secondly for a little sneak at sometihng I've been playing with this afternoon.  On April 1st Stampin' Up! launch their Mini Catalogue, I promise it is choc full of lovely goodies!  Well as demonstrators we get to place a pre order and mine arrived today!!!!!  I am so very excited!!!!!  In with my pre-order I also got the distressing essentials kit and I have to say for a girl who is normally very neat and precise I enjoyed squishing, scrunching, filing and getting inky :)

For now this is all I can post, it's a little sneaky pic of the sentiment on my project (from Just Believe) I promise that I will post the whole project once the Mini is launched!

Oh and finally my darling little girl has had a big day today!  This morning she rolled over for the first time and then at bedtime I found her first tooth!  I can't quite believe that tiny little bundle has turned into this...

Friday, 4 March 2011

Make a Monster...


 No - not the stamp set!  I promised that I would share piccies of the family's new addition - meet Horace 
Wartnose!


Thomas' last homework project was to make a monster, we spent a lovely afternoon at my Mum's and this was the result.  He was so proud of himself!

I'll be back soon with some more crafty fun - had a really busy couple of weeks, so haven't found time to post - bad blogger!

By for now!